A honey bee is a bee that is a member of the genus Apis. In today’s tutorial, we will provide step-by-step instructions for drawing a honey bee realistically and coloring it beautifully.
In this tutorial, we will guide you through a step-by-step drawing of a honey bee designed for kids. Follow along with us as we draw a honey bee in 8 easy steps.
Art Materials & Equipment
- Drawing Paper
- Colors of Your Choices
- Pencil
- Eraser
- Sharpener
- Marker
- Pen
Video Tutorial
Steps To Draw A Honey Bee
You can either follow our video tutorial or the instructions below. You can preview today’s tutorial in the image below.

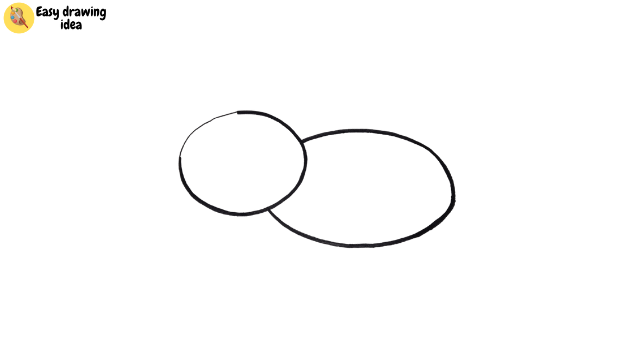
Step 1: Draw Full Circle

We’ll begin with the head of the honey bee. Start by drawing a circle for the head of the honey bee as shown in the image above. We are using a pencil to sketch the rough outlines.
Step 2: Outline Body of Honey Bee

Now, outline the head of the bee referring to the rough sketch we drew in step 1 and draw an oval to represent the bee’s body as depicted in the image above. Ensure that you use a black pen or pencil to sketch the outline.
Step 3: Draw Two Wings

Next, draw an oval-like shape to represent the honey bee’s wings. Note: draw this shape at the top of the body as shown in the image above.
Step 4: Draw Two Charming Eyes

Similarly, draw a small circle at the head to represent the eye of the honey bee. Also, draw another small circle right next to it to represent another eye as shown in the image above.
Step 5: Draw Hand and Sting

Now, draw the forelegs of the bee as shown in the drawing above. At the back of the bee, draw a sharp sting as depicted in the drawing above.
Step 7: Erase Rough Lines

Now, erase any unwanted rough lines, particularly around the eyes and wings as shown in the image above.
Step 7: Draw Lines in the Body

Now, draw some lines on the body of the bee as shown in the drawing. Also, add some lines on the wings of the bee as depicted in the image above.
Step 8: Draw Charming Eyes with Smiley Face

In the final step, draw a small circle for the charming eyes. Inside the eyes, draw another small circle for the pupils and color it black. Next, draw two antennae at the top of the head, and then draw a smiley face for the bee as shown in the image above.
Coloring a Bee
After the drawing of a honey bee is completed we move forward with coloring the honey bee. For coloring, we chose some basic colors.
Since the honey bee is naturally yellow and black, fill in the body of the honey bee with yellow and black colors. Then, add a light blue color to the wings of the bee and use orange for the antennae.
Colour Details:
- Yellow
- Black
- Orange
- Light Blue

After coloring, we get a realistic honey bee. You can use a pencil color (we made it digital).
Our Masterpiece is Ready
Finally, we’ve drawn a cute honey bee and colored it beautifully. This honey bee looks adorable and realistic. We hope you find our tutorial easy and simple to follow.
This is how you can easily draw a honey bee with our step-by-step tutorial. Share your thoughts in the comments below if you found our tutorial helpful, and feel free to suggest a topic for our next tutorial.


